namabakery wins its first cook-off!

Greetings from New York City! With job changes, having projects outside of baking, and moving around (between 3 different places this year), my namabakery projects haven’t been getting much love and affection, but finally, after more than a year since my last post, I have something I can share with you!

Recently, my office had its own holiday cook-off, where contestants can share a sweet or savory dish or both. Of course, I got really excited for an opportunity to bake for my office so I signed up for it. I was hesitant at first though, because I don’t have a kitchen here, so I’d have to go back to NJ to bake, which means I would have to transport the finished products all the way to NYC. Why can’t I just borrow someone else’s kitchen in NYC? Because all my baking equipment is in NJ and my baking projects require a LOT of counter/table space. It’s more than just having an oven; every oven bakes differently, and that can affect the outcome of whatever you are baking. That said, yes, I am very nitpicky about my kitchen space. 😛 Anyway, ramblings aside, I started brainstorming a couple days before the cook-off. My friend, Cui, had an awesome gingerbread recipe which contained coconut, almond, and flaxseed; tastes nothing like the typical gingerbread, but has a lightly sweetened flavor and uses pretty healthy ingredients, which I really like and was tempted to incorporate this into the baking project. I also wanted to bring back the white chocolate spheres I did 2 years ago because I felt that they could’ve been executed in a better way. At that time, it was just an experiment for my own practice so I’m not too crazy about the outcome of what I did with them. With the gingerbread recipe and white chocolate spheres in mind, I decided to make white chocolate snow globes with mini gingerbread houses (using the traditional recipe), on top of gingerbread cupcakes (using Cui’s recipe). After a full weekend of prepping the snow globes, baking, and making Jimmy the human mixer (cuz my electrical mixer was burning up) and my ride to various stores to pick up ingredients, namabakery won Best Presentation and Best Overall. Though namabakery can only keep the Golden Ladle until the next cook-off, it was an honor to have received the top prize for this round.

IMG_7702r

Gingerbread house inside a white chocolate globe, on a gingerbread cupcake.

IMG_7699r

process02r

This is why I need lots of table space. Also, as you can see in the photo, there were other concepts going on, but I ran out of time so they didn’t make it into the final product. I was going to make white chocolate sleighs with marshmallow gifts inside.

process04r

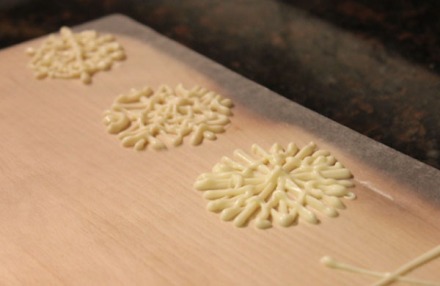
White chocolate drying. Besides the snow globes, I was also going to make 3-dimensional houses (one of them comes with a garage). Hence you see roof panels and front and back pieces of the house with decorations on the door and circular window.

process01r

White chocolate up close.

IMG_7685r

Mini gingerbread house with christmas lights on. This is what it looks like without the globe on.

IMG_7693r

Ok, so I actually made 2 types of cupcakes. The ones with Christmas trees and snowflakes are brownie cupcakes. The snow globes use the gingerbread recipe.

IMG_7696r IMG_7688r 20131216_121730r 20131216_121713r 20131216_121651r

Watermelon Turtle

Let’s take a break from baking and talk about watermelons! It’s been a while since I last posted and I don’t have any baking projects I want to show, but I did work on a watermelon project over the weekend. Summertime is a great time to exercise your watermelon cutting skills and through Pinterest, I came across a website where I was inspired by what others have done with watermelons thus far. I’ve never really created anything special with watermelons, except make a basket out of them when I was younger, but when I saw this turtle, I knew that was my next project.

Tools: a long knife, paring knife, channel knife, toothpicks, and melon baller.

Ingredients: 1 oblong seedless watermelon, blueberries, grapes, and 2 peppercorns.

I searched many places for the channel knife – Target, Crate & Barrel, Chef Central, Bed, Bath, & Beyond – and all the employees gave me a blank stare when I asked if they carried channel knives. Surprisingly, IKEA had them and they come together with a melon baller too. If you’re not on a time crunch, you can purchase these online. Amazon.com has a lot to choose from.

Below is the process work and the final product. I didn’t follow all the instructions on the website, such as not using the dry erase marker, so I’ll give you my version according to what I did.

Instructions:

  1. Choose an oblong seedless watermelon for carving.
  2. Wash watermelon and pat dry.
  3. Cut in half lengthwise.
  4. Cut a slice no more than 1/4″ thick off the bottom, lengthwise, to create a flat base.
  5. Hollow out both sides, using a melon baller.
  6. Carve out block design in the bottom side, using a channel knife. (Copy from photo).
  7. Take the top half, cut that in half lengthwise. The top portion will be the shell. The bottom portion of the top half will be for the head, legs, and tail.
  8. Draw the legs and head on top piece (not being used for the shell) by lightly scoring with the tip of the paring knife. I went about 0.5 mm – 1 mm deep.
  9. After the sketch lines look ok, cut through the piece all the way, using the paring knife.
  10. Carve the shell design using the channel knife.
  11. Add peppercorns to the eye holes to fill.
  12. Fill bottom with fruit salad.
  13. Attach legs, head, and tail to shell using strong toothpicks or skewers, and put on top of salad.

Scooped out the inside of the watermelon using a melon baller

Made the block design around the bottom piece using a channel knife

Cutting out the limbs, head, and tail

Using the channel knife to create the turtle shell pattern

Attached limbs, head, and tail to the shell with toothpicks. Cut out small holes for the peppercorn to create eyes. Added the fruit salad.

Finished watermelon turtle

namabakery wants your pins!

One of the goals of namabakery is to interact with and get feedback from the community. I also thought it would be exciting to see what inspires all of you to bake (or cook!). For this reason, I’ve opened up a Guest Board under nambakery’s Pinterest account: pinterest.com/namabakery/guest-board. This board is for you to contribute pins to a collection of inspirational and resourceful information in regards to baking and cooking.

To be a contributor for the Guest Board, follow all namabakery boards (pinterest.com/namabakery > click ‘Follow All’). I will follow you back so I can add you onto the list of contributors. Pinterest will only allow me to add you if we are “following” each other.

Now the question is, how many contributors can Pinterest allow on one board? 🙂 I guess we’ll see.

Valentine’s Day Project – with free tutorial

While Valentine’s Day may have passed just a couple of days ago, that doesn’t mean we shouldn’t need to show love on any other day! Below is the most recent project. I really wanted to link two separate hearts together and seamlessly, using white chocolate and basic at-home, piping technique of course. I Googled the concept to make sure that no one has done it, and so far, it doesn’t seem like anyone has. But if I’m wrong, let me know; I’m curious if anyone else has accomplished this at home. Otherwise, yay for another namabakery original!

PS – I meant to post this long before Valentine’s Day, but I got so swamped with other projects. Hence, the delayed posting. But don’t let that stop you from using the techniques demonstrated in this tutorial on other dessert projects! Be creative! 😉

Cake Recipe:
Ghirardelli® Individual Chocolate Lava Cakes

1. Using the x-acto knife’s tip, draw hearts onto a folded-up sheet of wax paper. I didn’t use pen or marker because I don’t think they’re safe to consume and the white chocolate will go directly on this template.

2. Cut out some hearts.

3. Pipe patterns onto the wax paper template. Add sugar pearls or any decorative pieces on before the white chocolate hardens.

4. Link a second heart template onto the first finished heart, and pipe the patterns on top of that. Make sure the white chocolate for the second heart does not touch the first. Otherwise the hearts won’t swing freely when they dry. Let the hearts rest on a platform where they can safely harden and not lose its form or have white chocolate sliding off the template.

5. After at least 15 mins, or when the white chocolate has dried and hardened, carefully remove the wax paper.

IMG_6042e

DIY: White Chocolate Snowflakes

As promised, here is namabakery’s first free tutorial! Since some of you are looking for ideas on winter-themed cupcakes and decorations, I am going to demonstrate something fun and easy to make.

In this tutorial, you will learn how to temper white chocolate first and then pipe snowflakes. Feel free to pipe anything else besides snowflakes though. The whole process, from tempering to fully hardened snowflakes, took about 2-3 hours. This will vary though, depending on how much you are going to pipe, or if you accidentally burn the white chocolate and need to start over, etc.

Ready?

Here’s what you need:

– wax paper
– white chocolate morsels
– Ziploc snack bags
– scotch tape
– scissors
– knife
– glass or ceramic bowl for mixing and microwaving
– cutting board (optional)
– If you have piping bags, then you won’t need the Ziploc bags and scotch tape. Also, if using a piping bag, I like to use a tall cup to help hold the bag open while I pour the white chocolate in. But I am going to use common household items in this tutorial so that you won’t have to buy piping bags to do this.

Directions

1. Place a 2″ piece of Scotch tape over a bottom corner of the bag. Make sure it is lined up against the edge of the bag.


2. Place a second piece of tape over the same corner of the bag, overlapping the first piece of tape.


It should look like the above.


3. Fill about 3/4 of your bowl with the white chocolate morsels.


4. Microwave the bowl of morsels at 50-60% power (adjust accordingly to how powerful your microwave is) for about 1 minute. Stir with the knife, microwave for about 15 seconds, stir, microwave, and repeat until most of the morsels have melted.


5. Add fresh morsels (about 1/4 of the amount already in the bowl) to the already melted batch. Stir, then microwave for another 15 seconds.


Repeat until the white chocolate is like paint dripping into a bucket. Keep stirring until the are no clumps left.


6. Pour the white chocolate into the bag.


7. Squeeze out the air and then seal the bag. Air bubbles will disrupt the white chocolate flowing out of the bag’s tip and cause breakage while piping.


8. Lay a sheet of wax paper over the cutting board. (The cutting board is here to make it easier to move your work to a different location without damaging what you’ve piped. I have to do this because my mom tends to move my stuff out of the kitchen while I’m not there, and that’s how things break.)


9. Cut about 1/8 inch (3mm) of the tip of the taped corner off. It’s always safer to cut a hole too small so that you can continue to cut and make the hole bigger if the piped lines appear too thin.


10. Squeegee the white chocolate towards the taped corner.


11. Twist the top of the bag. This creates more pressure while you’re piping the white chocolate.


12. Pipe the white chocolate onto the wax paper. Practice by drawing lines first. Don’t forget to release pressure when you want to end the line. Turn the bag tip upwards will help prevent the white chocolate from dripping during the times when you’re not piping.


The harder you squeeze the bag, the faster you need to move your hand. Otherwise, the white chocolate will start piling up, creating a vertical squiggly line and the line won’t be smooth anymore. This takes some practice.


Feel free to make snowflakes in different sizes.


After about 30 minutes, they should be pretty dry. Carefully peel the wax paper off and gently press the snowflake onto the frosted cupcake.


Here is the finished product.


To make a Christmas tree like this one (above), use a large, medium, and small snowflake. Add a dollop of white chocolate or frosting in between each snowflake to hold them together. The white chocolate will be sturdier though.

I hope this free tutorial was helpful. Feel free to ask questions or make suggestions if you have any. I would love to hear you! Happy holidays, and happy baking! 😀

Wintery Spheres of Heavenly Chocolate

Just last week, I posted on the Facebook page, “What would you like to see namabakery design/create next?” I received a couple responses (some were offline), and Sumenta Paul’s “Wintery Spheres of Heavenly Chocolate” theme had been selected.

To be honest, it was more challenging than I had thought. But challenge is a good thing! I was definitely thinking of white chocolate spheres, but I didn’t want solid ball of white chocolate on top of a cupcake. That would’ve looked a little lame and uninteresting, I think. 😛 I wanted to incorporate namabakery’s signature pattern and I wanted the sphere hollow so I could fit a mini cupcake in it to resemble a wintery globe encapsulating a cherishable item or surprise inside. I experimented with a couple different techniques. Of course, some failed, so it was back to the drawing board – brainstorming the process of putting together intricate spheres that didn’t break when the “mold” came off, or crumbled under warm temperature. Keep in mind, there were no special molds bought for this. I am only using common household items to create the decorative pieces for namabakery cupcakes.

After three days of tempering white chocolate, chocolate, piping the ingredients, grinding up scrap pieces of white chocolate, remelting the pieces, repipingmeltinggrindingremeltingrepiping, I finally managed to come up with the white chocolate spheres which I had envisioned.

On a side note, before we move onto the pictures, I am not a huge fan of artificial food coloring. Research has shown that consuming too much food dye may cause cancer, thyroid tumors, allergies, mutagenic effects, kidney damage, asthma attacks, adrenal gland tumors, chromosomal damage, and more. To make your own natural food dye at home, try using fruits or vegetables (such as raspberry juice for these red velvet cupcakes). Some sources to start with: http://www.ehow.com/how_2302808_make-natural-food-coloring.htmlhttp://www.marthastewart.com/267850/dyeing-eggs-naturally. I could’ve done this project with just plain white cupcakes, but for the sake of holiday spirit, visual contrast, and those who have asked if I bake anything else besides brownies and chocolate cake, I am going to use red velvet this time. 😛

As promised, here are the results, along with some random other winter holiday-themed cupcakes!

PS – Thanks to Steven Su for letting me borrow his awesome camera!

Empty sphere of white chocolate awaits to capture a cupcake

White chocolate sphere successfully captures a mini cupcake while spying on another one

Sphere with solid bottom half

You know Christmas will be good when the gift is larger than the Christmas tree itself.

Turkey Cupcakes

Apologies for the delay! Just came back from vacation not too long ago, so I didn’t get the chance to post this until now. These White Chocolate Turkeys on Mini Brownie Cupcakes were made for a Thanksgiving dinner event a couple weeks ago.

After a few hours of sketching and paper prototyping, I finally found a design solution which I thought would address my main concerns – structural support (was it going to hold up during transport or fall apart by the time I get there), time limit (it was getting really late and the process of making anything with white chocolate/chocolate requires hours of preparation work), and aesthetic appeal (will it look like a turkey).

I ended up making these white chocolate turkeys from 10pm til 5am. A lot of times I am most productive during the late hours, and the best concepts come when I am asleep (but that’s a story for another day). When I was done, mom came downstairs with the biggest scowl on her face because every little noise coming from the kitchen gets echoed and amplified on the way to her room. Woops. 😛

The best part about these turkeys is that NONE of them broke when I brought them over to the party! They survived every bump on the road from Neshanic Station to Jersey City. This is a first, and a very big improvement for namabakery. 😀

Enjoy!